
Questions
1. Write an any four features of PIC microcontroller.(4)
ANS: PIC is a family of modified Harvard architecture microcontrollers made by Microchip Technology, derived from the PIC1650 originally developed by General Instrument's Microelectronics Division. The name PIC initially referred to "Peripheral Interface Controller".
PICs are popular with both industrial developers and hobbyists alike due to their low cost, wide availability, large user base, extensive collection of application notes, availability of low cost or free development tools, and serial programming (and re-programming with flash memory) capability.
The PIC architecture is characterized by its multiple attributes:
- Separate code and data spaces (Harvard architecture).
- A small number of fixed length instructions
- Most instructions are single cycle execution (2 clock cycles, or 4 clock cycles in 8-bit models), with one delay cycle on branches and skips
- One accumulator (W0), the use of which (as source operand) is implied (i.e. is not encoded in the opcode)
- All RAM locations function as registers as both source and/or destination of math and other functions.
- A hardware stack for storing return addresses
- small amount of addressable data space (32, 128, or 256 bytes, depending on the family), extended through banking
- Data space mapped CPU, port, and peripheral registers
- ALU status flags are mapped into the data space
- The program counter is also mapped into the data space and writable (this is used to implement indirect jumps).
PIC 16F877A Features:
Ø 100,000 erase/write cycle Enhanced Flash program memory typical
Ø 1,000,000 erase/write cycle Data EEPROM memory typical
Ø Data EEPROM Retention > 40 years
Ø Self-reprogrammable under software control
Ø In-Circuit Serial Programming™ (ICSP™) via two pins
Ø Single-supply 5V In-Circuit Serial Programming
Ø Watchdog Timer (WDT) with its own on-chip RC oscillator for reliable operation
Ø Programmable code protection
Ø Power saving Sleep mode
Ø Selectable oscillator options
Ø In-Circuit Debug (ICD) via two pins
Advantages
Ø Small instruction set to learn
Ø RISC architecture
Ø Built in oscillator with selectable speeds
Ø Inexpensive microcontrollers
Ø Wide range of interfaces including I²C, SPI, USB, USART, A/D, programmable comparators, PWM, LIN, CAN, PSP, and Ethernet
Ø Availability of processors in DIL package make them easy to handle for hobby use.
---------------------------------------------------------------------------------------------------------------------------------------
2. Draw the PIC microcontroller architecture and explain it in short.(8)
Ans: PIC 16F877 Architecture
PIC 16F877 is a 40-pin 8-Bit CMOS FLASH Microcontroller from Microchip. The core architecture is high-performance RISC CPU with only 35 single word1 instructions. Since it follows the RISC architecture, all single cycle instructions take only one instruction cycle except for program branches which take two cycles. 16F877 comes with 3 operating speeds with 4, 8, or 20 MHz clock input. Since each instruction cycle takes four operating clock cycles, each instruction takes 0.2 µs when 20MHz oscillator is used. It has two types of internal memories: program memory and data memory. Program memory is provided by 8K words (or 8K*14 bits) of FLASH Memory, and data memory has two sources. One type of data memory is a 368-byte RAM (random access memory) and the other is 256-byte EEPROM (Electrically erasable programmable ROM). The core feature includes interrupt capability up to 14 sources, power saving SLEEP mode, and single 5V In-Circuit Serial Programming (ICSP) capability. The sink/source current, which indicates a driving power from I/O port, is high with 25mA. Power consumption is less than 2 mA in 5V operating condition.
The peripheral features include:
Ø 3 time blocks: Timer0 for 8-bit timer/counter; Timer1 for 16-bit timer/counter; and Timer2: 8-bit timer/counter with 8-bit period register, prescaler and postscaler.
Ø Two Capture, Compare, PWM modules for capturing, comparing 16-bit, and PWM generation with 10-bit resolution.
Ø 10-bit multi-channel (max 8)Analog-to-Digital converter module.
Ø Synchronous Serial Port (SSP) with SPI (Master Mode) and I2C2 (Master/Slave)
Ø Universal Synchronous Asynchronous Receiver Transmitter (USART/SCI) with 9-bit address detection
Ø Parallel Slave Port (PSP) 8-bits wide, with external RD, WR and CS controls I/O ports.
Input/output ports
PIC16F877 has 5 basic input/output ports. They are usually denoted by PORT A (R A), PORT B (RB), PORT C (RC), PORT D (RD), and PORT E (RE). These ports are used for input/ output interfacing. In this controller, “PORT A” is only 6 bits wide (RA-0 to RA-7), ”PORT B” , “PORT C”,”PORT D” are only 8 bits wide (RB-0 to RB-7,RC-0 to RC-7,RD-0 to RD-7), ”PORT E” has only 3 bit wide (RE-0 to RE-7).
|
PORT-A |
RA-0 to RA-5 |
6 bit wide |
|
PORT-B |
RB-0 to RB-7 |
8 bit wide |
|
PORT-C |
RC-0 to RC-7 |
8 bit wide |
|
PORT-D |
RD-0 to RD-7 |
8 bit wide |
|
PORT-E |
RE-0 to RE-2 |
3 bit wid |
All these ports are bi-directional. The direction of the port is controlled by using TRIS(X) registers (TRIS A used to set the direction of PORT-A, TRIS B used to set the direction for PORT-B, etc.). Setting a TRIS(X) bit ‘1’ will set the corresponding PORT(X) bit as input. Clearing a TRIS(X) bit ‘0’ will set the corresponding PORT(X) bit as output.
(If we want to set PORT A as an input, just set TRIS(A) bit to logical ‘1’ and want to set PORT B as an output, just set the PORT B bits to logical ‘0’.)
Ø Analog input port (AN0 TO AN7) : these ports are used for interfacing analog inputs.
Ø TX and RX: These are the USART transmission and reception ports.
Ø SCK: these pins are used for giving synchronous serial clock input.
Ø SCL: these pins act as an output for both SPI and I2C modes.
Ø DT: these are synchronous data terminals.
Ø CK: synchronous clock input.
Ø SD0: SPI data output (SPI Mode).
Ø SD1: SPI Data input (SPI mode).
Ø SDA: data input/output in I2C Mode.
Ø CCP1 and CCP2: these are capture/compare/PWM modules.
Ø OSC1: oscillator input/external clock.
Ø OSC2: oscillator output/clock out.
Ø MCLR: master clear pin (Active low reset).
Ø Vpp: programming voltage input.
Ø THV: High voltage test mode controlling.
Ø Vref (+/-): reference voltage.
Ø SS: Slave select for the synchronous serial port.
Ø T0CK1: clock input to TIMER 0.
Ø T1OSO: Timer 1 oscillator output.
Ø T1OS1: Timer 1 oscillator input.
Ø T1CK1: clock input to Timer 1.
Ø PGD: Serial programming data.
Ø PGC: serial programming clock.
Ø PGM: Low Voltage Programming input.
Ø INT: external interrupt.
Ø RD: Read control for parallel slave port.
Ø CS: Select control for parallel slave.
Ø PSP0 to PSP7: Parallel slave port.
Ø VDD: positive supply for logic and input pins.
Ø VSS: Ground reference for logic and input/output pins.


3. Describe the status register structure of PIC microcontroller.(4)
Ans: The Status register contains the arithmetic status of the ALU, the Reset status and the bank select bits for data memory. The Status register can be the destination for any instruction, as with any other register. If the Status register is the destination for an instruction that affects the Z, DC or C bits, then the write to these three bits is disabled. These bits are set or cleared according to the device logic. Furthermore, the TO and PD bits are not writable, therefore, the result of an instruction with the Status register as destination may be different than intended.


4. Describe memory organization of PIC microcontroller.(4)
Ans: The memory of a PIC 16F877 chip is divided into 3 sections. They are
- Program memory
- Data memory and
- Data EEPROM
1. Program memory
Program memory contains the programs that are written by the user. The program counter (PC) executes these stored commands one by one. Usually PIC16F877 devices have a 13 bit wide program counter that is capable of addressing 8K×14 bit program memory space. This memory is primarily used for storing the programs that are written (burned) to be used by the PIC. These devices also have 8K*14 bits of flash memory that can be electrically erasable /reprogrammed. Each time we write a new program to the controller, we must delete the old one at that time. The figure below shows the program memory map and stack.
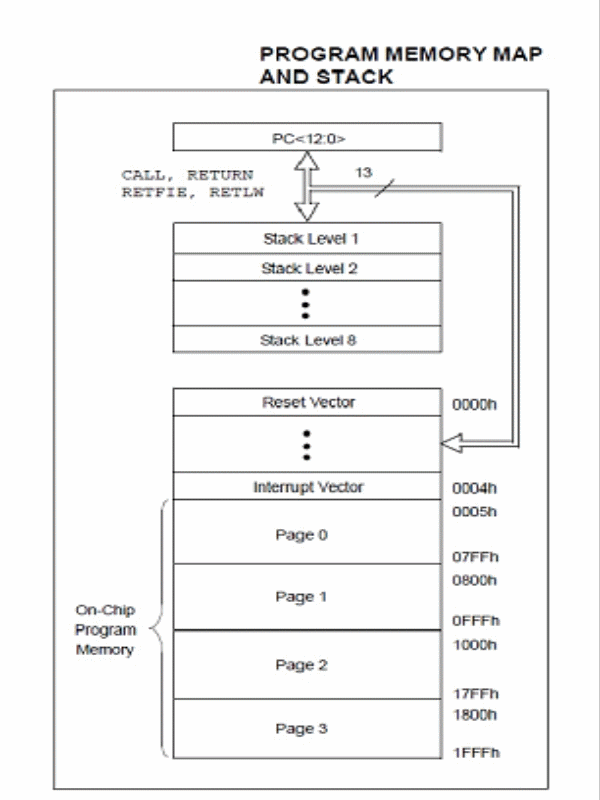
PIC16f877 Program Memory
Program counters (PC) is used to keep the track of the program execution by holding the address of the current instruction. The counter is automatically incremented to the next instruction during the current instruction execution.
The PIC16F87XA family has an 8-level deep x 13-bit wide hardware stack. The stack space is not a part of either program or data space and the stack pointers are not readable or writable. In the PIC microcontrollers, this is a special block of RAM memory used only for this purpose.
Each time the main program execution starts at address 0000 – Reset Vector. The address 0004 is “reserved” for the “interrupt service routine” (ISR).
2. PIC16F87XA Data Memory Organization
The data memory of PIC16F877 is separated into multiple banks which contain the general purpose registers (GPR) and special function registers (SPR). According to the type of the microcontroller, these banks may vary. The PIC16F877 chip only has four banks (BANK 0, BANK 1, BANK 2, and BANK4). Each bank holds 128 bytes of addressable memory.
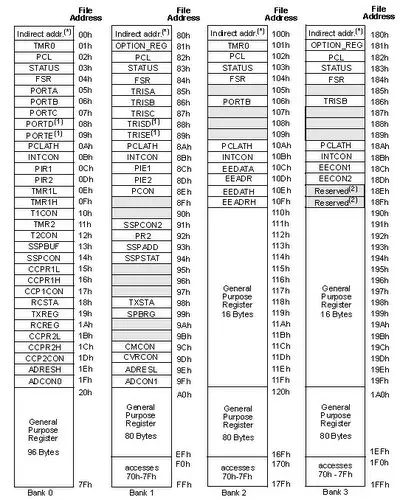
Data Memory Organization
The banked arrangement is necessary because there are only 7 bits are available in the instruction word for the addressing of a register, which gives only 128 addresses. The selection of the banks are determined by control bits RP1, RP0 in the STATUS registers Together the RP1, RP0 and the specified 7 bits effectively form a 9 bit address. The first 32 locations of Banks 1 and 2, and the first 16 locations of Banks2 and 3 are reserved for the mapping of the Special Function Registers (SFR’s).
|
BANK |
RP0 |
RP1 |
|
0 |
0 |
0 |
|
1 |
1 |
0 |
|
2 |
0 |
1 |
|
3 |
1 |
1 |
A bit of RP1 & RP0 of the STATUS register selects the bank access.
3. Data EEPROM and FLASH
The data EEPROM and Flash program memory is readable and writable during normal operation (over the full VDD range). This memory is not directly mapped in the register file space. Instead, it is indirectly addressed through the Special Function Registers. There are six SFRs used to read and write this memory:
• EECON1
• EECON2
• EEDATA
• EEDATH
• EEADR
• EEADRH
The EEPROM data memory allows single-byte read and writes. The Flash program memory allows single-word reads and four-word block writes. Program memory write operations automatically perform an erase-before write on blocks of four words. A byte write in data EEPROM memory automatically erases the location and writes the new data (erase-before-write). The write time is controlled by an on-chip timer. The write/erase voltages are generated by an on-chip charge pump, rated to operate over the voltage range of the device for byte or word operations.
---------------------------------------------------------------------------------------------------------------------------------------
5. Explain interrupt structure of PIC microcontroller.(4)
Ans: The PIC16F87X family has up to 14 sources of interrupt
1. External interrupt on RB0/INT (programmable edge trigger)
2. PortB change interrupt (RB7:RB4)
3. Timer0 interrupt
4. Parallel Slave Port interrupt
5. Analog to digital interrupt
6. UART Receive interrupt
7. UART Transmit Empty interrupt
8. Synchronous Serial Port interrupt
9. Compare/Capture/PWM-1 interrupt
10. Timer2 interrupt
11. Timer1 interrupt
12. EEPROM interrupt
13. Bus Collision(I2C) interrupt
14. Compare/Capture/PWM-2 interrupt

INTCON Register
The INTCON register is a readable and writable register, which contains various enable and flag bits for the
TMR0 register overflow, RB port change and external RB0/INT pin interrupts.
INTCON REGISTER (ADDRESS 0Bh, 8Bh, 10Bh, 18Bh)
Interrupt flag bits are set when an interrupt condition occurs regardless of the state of its corresponding enable bit or the global enable bit, GIE (INTCON<7>).
|
R/W-0 |
R/W-0 |
R/W-0 |
R/W-0 |
R/W-0 |
R/W-0 |
R/W-0 |
R/W-x |
|
GIE |
PEIE |
TMR0IE |
INTE |
RBIE |
TMR0IF |
INTF |
RBIF |
|
Bit7 |
Bit6 |
Bit5 |
Bit4 |
Bit3 |
Bit2 |
Bit1 |
Bit0 |
bit 7 GIE: Global Interrupt Enable bit
1 = Enables all unmasked interrupts
0 = Disables all interrupts
bit 6 PEIE: Peripheral Interrupt Enable bit
1 = Enables all unmasked peripheral interrupts
0 = Disables all peripheral interrupts
bit 5 TMR0IE: TMR0 Overflow Interrupt Enable bit
1 = Enables the TMR0 interrupt
0 = Disables the TMR0 interrupt
bit 4 INTE: RB0/INT External Interrupt Enable bit
1 = Enables the RB0/INT external interrupt
0 = Disables the RB0/INT external interrupt
bit 3 RBIE: RB Port Change Interrupt Enable bit
1 = Enables the RB port change interrupt
0 = Disables the RB port change interrupt
bit 2 TMR0IF: TMR0 Overflow Interrupt Flag bit
1 = TMR0 register has overflowed (must be cleared in software)
0 = TMR0 register did not overflow
bit 1 INTF: RB0/INT External Interrupt Flag bit
1 = The RB0/INT external interrupt occurred (must be cleared in software)
0 = The RB0/INT external interrupt did not occur
bit 0 RBIF: RB Port Change Interrupt Flag bit
1 = At least one of the RB7:RB4 pins changed state; a mismatch condition will continue to set
the bit. Reading PORTB will end the mismatch condition and allow the bit to be cleared (must be cleared in software).
0 = None of the RB7:RB4 pins have changed state
---------------------------------------------------------------------------------------------------------------------------------------6. Explain ADC module and associated registers in PIC microcontroller.(4)
Ans:ANALOG-TO-DIGITALCONVERTER (A/D) MODULE
The Analog-to-Digital (A/D) Converter module has five inputs for the 28-pin devices and eight for the 40/44-pin devices. The conversion of an analog input signal results in a corresponding 10-bit digital number. The A/D module has high and low-voltage reference input that is software selectable to some combination of VDD, VSS, RA2 or RA3. The A/D converter has a unique feature of being able to operate while the device is in Sleep mode. To operate in Sleep, the A/D clock must be derived from the A/D’s internal RC oscillator.
The A/D module has four registers. These registers are:
Ø A/D Result High Register (ADRESH)
Ø A/D Result Low Register (ADRESL)
Ø A/D Control Register 0 (ADCON0)
Ø A/D Control Register 1 (ADCON1)
The ADCON0 register, shown in Register 11-1, controls the operation of the A/D module. The ADCON1
register, shown in Register 11-2, configures the functions of the port pins. The port pins can be configured
as analog inputs (RA3 can also be the voltage reference) or as digital I/O.
ADCON0 REGISTER (ADDRESS 1Fh)


ADCON1 REGISTER (ADDRESS 9Fh)

The ADRESH:ADRESL registers contain the 10-bit result of the A/D conversion. When the A/D conversion is complete, the result is loaded into this A/D Result register pair, the GO/DONE bit (ADCON0<2>) is cleared and the A/D interrupt flag bit ADIF is set. The block diagram of the A/D module is shown in following figure.. After the A/D module has been configured as desired, the selected channel must be acquired before the conversion is started. The analog input channels must have their corresponding TRIS bits selected as inputs. After this acquisition time has elapsed, the A/D conversion can be started. To do an A/D Conversion, follow these steps:
1. Configure the A/D module:
Ø Configure analog pins/voltage reference anddigital I/O (ADCON1)
Ø Select A/D input channel (ADCON0)
Ø Select A/D conversion clock (ADCON0)
Ø Turn on A/D module (ADCON0)
2. Configure A/D interrupt (if desired):
Ø Clear ADIF bit
Ø Set ADIE bit
Ø Set PEIE bit
Ø Set GIE bit
3. Wait the required acquisition time.
4. Start conversion:
Ø Set GO/DONE bit (ADCON0)
5. Wait for A/D conversion to complete by either:
Ø Polling for the GO/DONE bit to be cleared (interrupts disabled); OR
Ø Waiting for the A/D interrupt
6. Read A/D Result register pair (ADRESH:ADRESL), clear bit ADIF if required.
7. For the next conversion, go to step 1 or step 2 as required. The A/D conversion time per bit is
defined as TAD.
ADC Bloc Diagram

6. Explain any four types of instructions with suitable example for PIC microcontroller.(4) \
Ans:
The PIC16 instruction set is highly orthogonal and is comprised of three basic categories:
Ø Byte-oriented operations
Ø Bit-oriented operations
Ø Literal and control operations
Each PIC16 instruction is a 14-bit word divided into an opcode which specifies the instruction type and one or more operands which further specify the operation of the instruction. The formats for each of the categories is presented in following Figure while the various opcode fields are summarized in following figure.
For byte-oriented instructions, ‘f’ represents a file register designator and ‘d’ represents a destination designator. The file register designator specifies which file register is to be used by the instruction. The destination designator specifies where the result of the operation is to be placed. If ‘d’ is zero, the result is placed in the W register. If ‘d’ is one, the result is placed in the file register specified in the instruction.
For bit-oriented instructions, ‘b’ represents a bit field designator which selects the bit affected by the operation, while ‘f’ represents the address of the file in which the bit is located.
For literal and control operations, ‘k’ represents an eight or eleven-bit constant or literal value One instruction cycle consists of four oscillator periods; for an oscillator frequency of 4 MHz, this gives a normal instruction execution time of 1 μs. All instructions are executed within a single instruction cycle, unless a conditional test is true, or the program counter is changed as a result of an instruction. When this occurs, the execution takes two instruction cycles with the second cycle executed as a NOP. All instruction examples use the format ‘0xhh’ to represent a hexadecimal number, where ‘h’ signifies a hexadecimal digit.
READ-MODIFY-WRITE OPERATIONS
Any instruction that specifies a file register as part of the instruction performs a Read-Modify-Write (R-M-W) operation. The register is read, the data is modified, and the result is stored according to either the instruction or the destination designator ‘d’. A read operation is performed on a register even if the instruction writes to that register. For example, a “CLRF PORTB” instruction will read PORTB, clear all the data bits, then write the result back to PORTB. This example would have the unintended result that the condition that sets the RBIF flag would be cleared
OPCODE FIELD DESCRIPTIONS

GENERAL FORMAT FOR INSTRUCTIONS

(For details of instructions with their respective example with description (total no is 35) please refer to the datasheet of PIC 16F877A)
-------------------------------------------------------------------------------------------------------------------------------------
7. Write a note on Timers used in PIC.
Ans: PIC16F877A has following Timer modules:
Ø Timer0
Ø Timer1
Ø Timer2
TIMER0 MODULE
The Timer0 module timer/counter has the following features:
Ø 8-bit timer/counter
Ø Readable and writable
Ø 8-bit software programmable prescaler
Ø Internal or external clock select
Ø Interrupt on overflow from FFh to 00h
Ø Edge select for external clock
Timer mode is selected by clearing bit T0CS (OPTION_REG<5>). In Timer mode, the Timer0 module will increment every instruction cycle (without prescaler). If the TMR0 register is written, the increment is inhibited for the following two instruction cycles. The user can work around this by writing an adjusted value to the TMR0 register. Counter mode is selected by setting bit T0CS (OPTION_REG<5>). In Counter mode, Timer0 will increment either on every rising or falling edge of pin RA4/T0CKI. The incrementing edge is determined by the Timer0 Source Edge Select bit, T0SE (OPTION_REG<4>). Clearing bit T0SE selects the rising
edge.
REGISTERS ASSOCIATED WITH TIMER0

TIMER1 MODULE
The Timer1 module is a 16-bit timer/counter consisting of two 8-bit registers (TMR1H and TMR1L) which are
readable and writable. The TMR1 register pair (TMR1H:TMR1L) increments from 0000h to FFFFh
and rolls over to 0000h. The TMR1 interrupt, if enabled, is generated on overflow which is latched in interrupt
flag bit, TMR1IF (PIR1<0>). This interrupt can be enabled/disabled by setting/clearing TMR1 interrupt
enable bit, TMR1IE (PIE1<0>). Timer1 can operate in one of two modes:
Ø As a Timer
Ø As a Counter
The operating mode is determined by the clock select bit, TMR1CS (T1CON<1>).
In Timer mode, Timer1 increments every instruction cycle. In Counter mode, it increments on every rising
edge of the external clock input. Timer1 can be enabled/disabled by setting/clearing control bit, TMR1ON (T1CON<0>). Timer1 also has an internal “Reset input”. This Reset can be generated by either of the two CCP modules When the Timer1 oscillator is enabled (T1OSCEN is set), the RC1/T1OSI/CCP2 and RC0/T1OSO/T1CKI pins become inputs. That is, the TRISC<1:0> value is ignored and these pins read as ‘0’.
T1CON: TIMER1 CONTROL REGISTER (ADDRESS 10h)
 bit 7-6 Unimplemented: Read as ‘0’
bit 5-4 T1CKPS1:T1CKPS0: Timer1 Input Clock Prescale Select bits
11 = 1:8 prescale value
10 = 1:4 prescale value
01 = 1:2 prescale value
00 = 1:1 prescale value
bit 3 T1OSCEN: Timer1 Oscillator Enable Control bit
1 = Oscillator is enabled
0 = Oscillator is shut-off (the oscillator inverter is turned off to eliminate power drain)
bit 2 T1SYNC: Timer1 External Clock Input Synchronization Control bit
When TMR1CS = 1:
1 = Do not synchronize external clock input
0 = Synchronize external clock input
When TMR1CS = 0:
This bit is ignored. Timer1 uses the internal clock when TMR1CS = 0.
bit 1 TMR1CS: Timer1 Clock Source Select bit
1 = External clock from pin RC0/T1OSO/T1CKI (on the rising edge)
0 = Internal clock (FOSC/4)
bit 0 TMR1ON: Timer1 On bit
1 = Enables Timer1
0 = Stops Timer1
TIMER2 MODULE
Timer2 is an 8-bit timer with a prescaler and a postscaler. It can be used as the PWM time base for the PWM mode of the CCP module(s). The TMR2 register is readable and writable and is cleared on any device Reset. The input clock (FOSC/4) has a prescale option of 1:1, 1:4 or 1:16, selected by control bits T2CKPS1 : T2CKPS0 (T2CON<1:0>). The Timer2 module has an 8-bit period register, PR2. Timer2 increments from 00h until it matches PR2 and then resets to 00h on the next increment cycle. PR2 is a readable and writable register. The PR2 register is initialized to FFh upon Reset. The match output of TMR2 goes through a 4-bit postscaler (which gives a 1:1 to 1:16 scaling inclusive) to generate a TMR2 interrupt (latched in flag bit, TMR2IF (PIR1<1>)). Timer2 can be shut-off by clearing control bit, TMR2ON (T2CON<2>), to minimize power consumption.
T2CON: TIMER2 CONTROL REGISTER (ADDRESS 12h)

bit 7 Unimplemented: Read as ‘0’
bit 6-3 TOUTPS3:TOUTPS0: Timer2 Output Postscale Select bits
0000 = 1:1 postscale
0001 = 1:2 postscale
0010 = 1:3 postscale
•
•
•
1111 = 1:16 postscale
bit 2 TMR2ON: Timer2 On bit
1 = Timer2 is on
0 = Timer2 is off
bit 1-0 T2CKPS1:T2CKPS0: Timer2 Clock Prescale Select bits
00 = Prescaler is 1
01 = Prescaler is 4
1x = Prescaler is 16
---------------------------------------------------------------------------------------------------------------------------------------
8. Write a .C. program for PIC microcontroller to output 55H and AAH alternatingly on port B.
ANS:
#include <pic.h>
#include <delay.c>
main()
{
TRISB=0; // declare portb as outpot
for(;;) // do forever
{
RB0=55h; // LED ON
DelayMs(250); // delay for 0.25 seconds
RB0=AAh; // LED OFF
DelayMs(250);
}
}